Self-Hosted Data Analytics: Delta Lake + Trino + DBT + Superset on Docker
A Practical Guide to Building Your Own Analytics Platform End-to-End

This is the second article from a 7-part series on building a self-hosted modern data platform with Docker. In this part, we’ll cover the configuration and deployment of the platform on Docker.
Later articles will dive into the platform’s layers and its open-source/license-free components: Trino, Hive, DBT, Superset.
We’ll discuss performance, scaling and other areas of improvements in the last article.
And in case you haven’t read the first article, you can find it here.
Part 2 - Configuration and Deployment
Configuring and deploying our mini-data-platform should be more or less an easy task, as we’ll be mostly relying on container images (except for DBT which will be required to be installed on your work station).
The whole solution leverages Docker Compose, a tool for defining and running multi-container applications.

GitHub Repository & Google Worksheets
The code for the entire solution can be found in this GitHub repository:
https://github.com/tttao/mini-data-platform
I encourage you to take same time and read the README.md document, which provides some useful information about the project, even if you will find some redundancy with this current article.
The source data that we will be using for showcasing the features of our data platform is hosted on Google Workspaces, as Google Sheets. I have taken some Covid 19 open-data from https://health.google.com/ and stored them as worksheets in Google Workspace.
There are 5 documents:
Worldwide Covid 19 vaccination data: https://docs.google.com/spreadsheets/d/1FVsXPi0saIIcfGcP9TK4RzCAclPtUQa0BZi_S9WZgZk/edit?gid=1282694019#gid=1282694019
Each row contains data for a given date, and a given location (location_key)Location key informations. The 4 worksheets contain the description for all the location_key codes that are used in the first worksheet. For example, it tells that the code PL_12_01 references Bochnia County in Lesser Poland, Poland.
There are about 40 000 codes, which I have split in chunks of 10 000, hence the 4 worksheets:
https://docs.google.com/spreadsheets/d/1kOR1LvKYm_R-cpzTK3FLmc54MSo9KHyG4_sIFBLCXSs/edit?gid=1496942347#gid=1496942347
https://docs.google.com/spreadsheets/d/17gt5vW4uC76Z6D5CMsHqdmXnc3azyKofSCl1SNo0HNk/edit?gid=1496942347#gid=1496942347
And finally, there’s a last worksheet that serves as a catalog, listing the name, sheet list, and ID of all the worksheets we discussed:
https://docs.google.com/spreadsheets/d/1nfvqyBHFHn-Kq434rUnF2IOvdJBDcz0TQsmMIPLGUa0/
As we’ll see later on, this worksheet is the entrypoint that Trino requires for ingesting data.
Pre-requisites: Docker, Python and DBT
First:
Install Docker Desktop.
Install Python3 (Python 3.11 is fine)
Then, from the folder when you checked out the GitHub Repository, create yourself a virtual environment:
python -m venv .venvActivate your virtual environment. Example in Powershell:
.venv\Scripts\activateAnd then install DBT and DBT Trino adapter. I’ve put those dependencies inside a requirement file:
pip install -r .\requirements.txtGoogle Workspace API: Configure the data sources
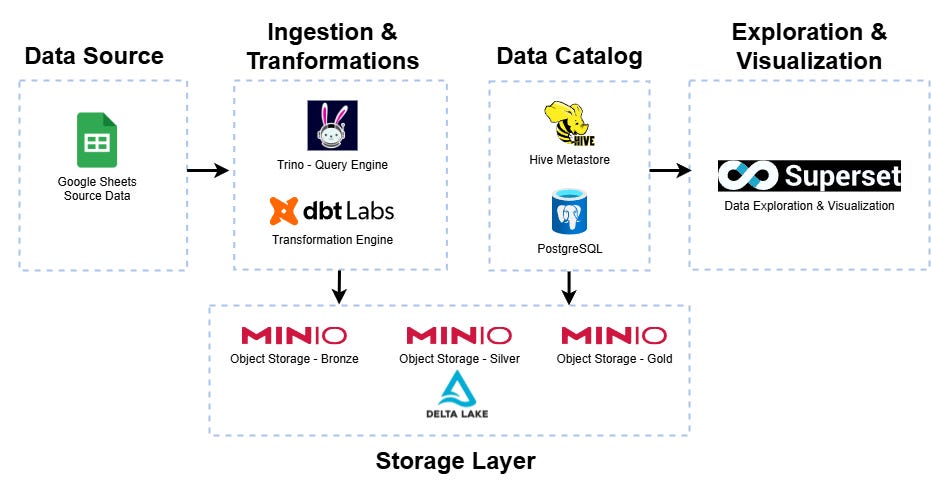
If you remember from the first part of this series, we will be using Trino to query data from Google Sheets, and store them in an Object Storage -Minio.
Trino interacts with Google Sheets using Google Workspace API.
In order for Trino to authenticate with Google Workspace API, you need to provide credentials.
The steps for generating those credentials are explained on Trino’s website: https://trino.io/docs/current/connector/googlesheets.html
Once you have generated Google Workspace credentials in JSON format, put them in ./trinodb/etc/gsheets-credentials.json
I have provided an example JSON file in that same directory, to show you how the structure of the file should look like.
Build and deploy the containers in Docker
Once the previous steps have been performed, you are ready build the custom Docker images for Trino and Superset. We’ll go into the details of those images in the next articles. For the time begin, we’ll just build the images and deploy the containers.
Build the images by executing this command from the parent folder of the repository folder:
docker compose build --no-cacheOnce the images are build, deploy the containers:
docker compose up -dTransform Data - Run DBT
Once the docker containers are up and running, it is time to build the silver layer. We’ll use DBT for performing this task.
The DBT project is pre-configured in the dbt subfolder, so that we just have to issue this command in order in order to run the transformations and build the silver layer:
C:\code\mini-data-platform\dbt> dbt runDeployment Overview
Now let’s take a step back: with the containers running, you can now play with 3 UIs: MinIO (the AWS S3 compatible object storage, where the bronze, silver and gold layer are stored in delta lake format), Trino (the distributed SQL engine), and Superset, the tool from Apache for data exploration and data visualisation:
MinIO
S3-compatible object store.
Management URL: http://localhost:9001/
Root user/pass set to admin
/password.
Trino
Cluster management dashboard: http://localhost:8082/ui/
User: no authentication, any username will work
Superset
Web UI : http://localhost:8088/
Admin credentials:
admin/admin
Final Step: Connect Superset to the Transformed Data
Before you can explore and visualize the transformed source data with Superset, you need to configure connections to the Bronze and Silver layers.
Login to Superset
Use the credentials:
Username:
adminPassword:
admin
Create Database Connections
Go to Settings → Database Connections
Add the following two databases:
Database 1: Bronze Layer
Name:
Trino_BronzeType:
TrinoSQLAlchemy URI:
trino://trino@trino/stagingDatabase 2: Silver Layer
Name:
Trino_SilverType:
TrinoSQLAlchemy URI:
trino://trino@trino/integrationExplore Your Data
Once the databases are configured, you can start using Superset SQL Lab to query data.
From there, take advantage of Superset’s full features to build custom charts and dashboards based on the Bronze and Silver layers.
What’s Next
At this point, your platform is no longer just an empty shell:
MinIO is running and ready to store your data
Hive Metastore + PostgreSQL are set up to track your tables
All core services are connected and running smoothly
Which means… it’s finally time to start working with data.
👉 In the next article, we’ll focus on MinIO and Delta Lake:
Uploading raw datasets into your MinIO buckets
Creating Delta Lake tables on top of these files
Registering those tables in the Hive Metastore
Verifying everything is accessible downstream
📚 This series covers:
Setting Up the Environment (Docker Compose) (you are here)
Storing Data in MinIO + Delta Lake
Querying with Trino
Transformations with dbt
Dashboards with Superset
Scaling & Next Steps